Saturday, August 24, 2013

Oracle 12c RDBMS Software installation


Start from a VNC or X Client


Prepare your file system for Oracle Home


Provide the MOS credentials if you would like to register for OCM ,
else skip the OCM options by unchecking the check box , (it never worked for me)


Check for any release updates if you would like to be on greatest and latest ,
I mostly don't use this option, as I decided which patches to go in at a later stage.


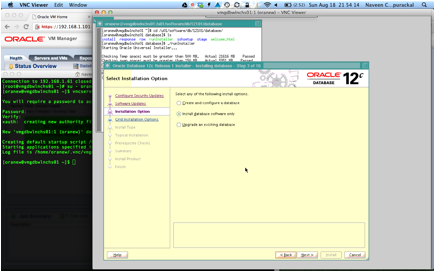
Do you want o create a started DB / seeded DB, I guess not, most of the cases you want to upgrade the existing DB ,
Or otherwise explore the dbca options , I would go for install software only


chose install software only


Select RAC or Single Node


Select language options


Select which edition, (refer your Licenses document for info about what you can select)


Select ORACLE_BASE and ORACLE_HOME


Select the various groups


runInstaller checks for a pre-requisites


If there are issues it will provide a fix up script

as root run the fixup  script to fix various pre-requisites and click ok


I have to ignore the swap space , (doesn't have abundant availability of space)


Here is a summary of installation.


Watch the progress.


Asks you to run root .sh


Once root.sh is complete click ok.


You are done with the Oracle 12c RDBMS Software.
Starting DBCA and DB creation to follow.


-->

My VM server Oracle VM Server release 3.2.2 - On an IBM x3850

My VM server

Oracle VM Server Oracle VM server release 3.2.2 - On an IBM x3850
Oracle VM Manager Version: 3.2.2.520 - on a Custom Made Desktop
(more on this, coming soon !)


Sunday, August 18, 2013

Extending partitions on a Linux virtual machine hosted in Oracle VM Server

Here is how I did it , 
I use 
Oracle VM Server Oracle VM server release 3.2.2
Oracle VM Manager Version: 3.2.2.520

VMs on OEL  - Oracle Linux Server release 5.9
On an IBM x3850

Shutdown the VM
Navigate to VM Machines Oracle VM Home > Servers and VMs > Server Pools > > Stop
Edit VM  
Navigate to VM Machines Oracle VM Home > Servers and VMs > Server Pools > > Edit 

On the Disk Tab - Select the hard disk you would like to extend 
Update the required size,  Click OK
Start  the VM
ssh to vm and Log in as root
Use frisk to find out the info   At the command prompt type fdisk -l
[root@vmgdbwlnchs01 ~]# fdisk -l 

Disk /dev/hda: 69.7 GB, 69793218560 bytes
255 heads, 63 sectors/track, 8485 cylinders
Units = cylinders of 16065 * 512 = 8225280 bytes

  Device Boot      Start         End      Blocks   Id  System
/dev/hda1   *           1          13      104391   83  Linux
/dev/hda2              14        6527    52323705   8e  Linux LVM

Disk /dev/dm-0: 47.3 GB, 47311749120 bytes
255 heads, 63 sectors/track, 5751 cylinders
Units = cylinders of 16065 * 512 = 8225280 bytes

Disk /dev/dm-0 doesn't contain a valid partition table

Disk /dev/dm-1: 6241 MB, 6241124352 bytes
255 heads, 63 sectors/track, 758 cylinders
Units = cylinders of 16065 * 512 = 8225280 bytes

Disk /dev/dm-1 doesn't contain a valid partition table

The response should say something like Disk /dev/hda: 69.7 GB, 69793218560 bytes

At the command prompt type fdisk /dev/hda. 
Type p to print the partition table and press Enter 
Type n to add a new partition
Type p again to make it a primary partition
Now you'll be prompted to pick the first cylinder which will most likely come at the end of your last partition 
Type w to save these changes
[root@vmgdbwlnchs01 ~]# fdisk /dev/hda

The number of cylinders for this disk is set to 8485.
There is nothing wrong with that, but this is larger than 1024,
and could in certain setups cause problems with:
1) software that runs at boot time (e.g., old versions of LILO)
2) booting and partitioning software from other OSs
  (e.g., DOS FDISK, OS/2 FDISK)

Command (m for help): p

Disk /dev/hda: 69.7 GB, 69793218560 bytes
255 heads, 63 sectors/track, 8485 cylinders
Units = cylinders of 16065 * 512 = 8225280 bytes

  Device Boot      Start         End      Blocks   Id  System
/dev/hda1   *           1          13      104391   83  Linux
/dev/hda2              14        6527    52323705   8e  Linux LVM

Command (m for help): n
Command action
  e   extended
  p   primary partition (1-4)
p
Partition number (1-4): 3
First cylinder (6528-8485, default 6528): 
Using default value 6528
Last cylinder or +size or +sizeM or +sizeK (6528-8485, default 8485): 
Using default value 8485

Command (m for help): w
The partition table has been altered!

Calling ioctl() to re-read partition table.

WARNING: Re-reading the partition table failed with error 16: Device or resource busy.
The kernel still uses the old table.
The new table will be used at the next reboot.
Syncing disks.

Restart the VM - Must 
Log back in as root

At the command prompt type fdisk -l. You'll notice another partition is present.  initialize this new partition as a physical volume using pvcreate 
[root@vmgdbwlnchs01 ~]# fdisk -l 

Disk /dev/hda: 69.7 GB, 69793218560 bytes
255 heads, 63 sectors/track, 8485 cylinders
Units = cylinders of 16065 * 512 = 8225280 bytes

  Device Boot      Start         End      Blocks   Id  System
/dev/hda1   *           1          13      104391   83  Linux
/dev/hda2              14        6527    52323705   8e  Linux LVM
/dev/hda3            6528        8485    15727635   83  Linux

Disk /dev/dm-0: 47.3 GB, 47311749120 bytes
255 heads, 63 sectors/track, 5751 cylinders
Units = cylinders of 16065 * 512 = 8225280 bytes

Disk /dev/dm-0 doesn't contain a valid partition table

Disk /dev/dm-1: 6241 MB, 6241124352 bytes
255 heads, 63 sectors/track, 758 cylinders
Units = cylinders of 16065 * 512 = 8225280 bytes

Disk /dev/dm-1 doesn't contain a valid partition table

[root@vmgdbwlnchs01 ~]# pvcreate /dev/hda3
 Writing physical volume data to disk "/dev/hda3"
 Physical volume "/dev/hda3" successfully created
  
Add the physical volume to the existing volume group using the vgextend command. use  df -h to find the name of the volume group.  
[root@vmgdbwlnchs01 ~]# df -hP
Filesystem            Size  Used Avail Use% Mounted on
/dev/mapper/VolGroup00-LogVol00   43G   34G  7.4G  82% /
/dev/hda1              99M   49M   46M  52% /boot
tmpfs                 3.8G     0  3.8G   0% /dev/shm
192.168.1.101:/u01/software  643G  328G  282G  54% /u01/software

[root@vmgdbwlnchs01 ~]# vgextend VolGroup00 /dev/hda3 
 Volume group "VolGroup00" successfully extended


Get the free space available on the physical volume type vgdisplay [volume group]  and use pvdisplay to check if everything is fine or not . 
[root@vmgdbwlnchs01 ~]# vgdisplay VolGroup00 
 --- Volume group ---
 VG Name               VolGroup00
 System ID             
 Format                lvm2
 Metadata Areas        2
 Metadata Sequence No  4
 VG Access             read/write
 VG Status             resizable
 MAX LV                0
 Cur LV                2
 Open LV               2
 Max PV                0
 Cur PV                2
 Act PV                2
 VG Size               64.84 GB
 PE Size               32.00 MB
 Total PE              2075
 Alloc PE / Size       1596 / 49.88 GB
 Free  PE / Size       479 / 14.97 GB
 VG UUID               vwAxOp-LL9a-xkvk-BYbt-OmLd-intU-kNpjW2
   
[root@vmgdbwlnchs01 ~]# pvdisplay 
 --- Physical volume ---
 PV Name               /dev/hda2
 VG Name               VolGroup00
 PV Size               49.90 GB / not usable 25.37 MB
 Allocatable           yes (but full)
 PE Size (KByte)       32768
 Total PE              1596
 Free PE               0
 Allocated PE          1596
 PV UUID               0djEdP-G0t9-1BOH-L4rN-wwa8-XM5L-RqtJBz
  
 --- Physical volume ---
 PV Name               /dev/hda3
 VG Name               VolGroup00
 PV Size               15.00 GB / not usable 31.02 MB
 Allocatable           yes 
 PE Size (KByte)       32768
 Total PE              479
 Free PE               479
 Allocated PE          0
 PV UUID               GbbNYH-Ii2B-dh4P-A2nt-zoo2-uRCQ-xtM3MR


Extend the logical volume by the amount of free space (on the command line use a digit less, else you might see Insufficient free space Here i am using 14.95, though it shows me 14.97 above)) 
[root@vmgdbwlnchs01 ~]# lvextend -L+14.95G /dev/VolGroup00/LogVol00
 Rounding up size to full physical extent 14.97 GB
 Extending logical volume LogVol00 to 59.03 GB
 Logical volume LogVol00 successfully resized

Expand the  file system in the logical volume using resize2fs 
[root@vmgdbwlnchs01 ~]# resize2fs /dev/VolGroup00/LogVol00
resize2fs 1.39 (29-May-2006)
Filesystem at /dev/VolGroup00/LogVol00 is mounted on /; on-line resizing required
Performing an on-line resize of /dev/VolGroup00/LogVol00 to 15474688 (4k) blocks.
The filesystem on /dev/VolGroup00/LogVol00 is now 15474688 blocks long.


Check the space using df -hP 
[root@vmgdbwlnchs01 ~]# df -hP
Filesystem             Size  Used Avail Use% Mounted on
/dev/mapper/VolGroup00-LogVol00   58G   34G   22G  62% /
/dev/hda1               99M   49M   46M  52% /boot
tmpfs                  3.8G     0  3.8G   0% /dev/shm
192.168.1.101:/u01/software   643G  328G  282G  54% /u01/software
none                   3.8G  104K  3.8G   1% /var/lib/xenstored


This machine ill use to install 12c DB, will update soon.